
Nesting KVM inside VSphere is the easy part!
Using Ubuntu, XML and Linux bridges to build a virtual lab to experiment on automation and migration to the Model-Driven architecture
Having had not much choice about the environment in which I’ll be working in, I headed off to build a lab with SROS devices on Vsphere 6.7
General vSIM Concept
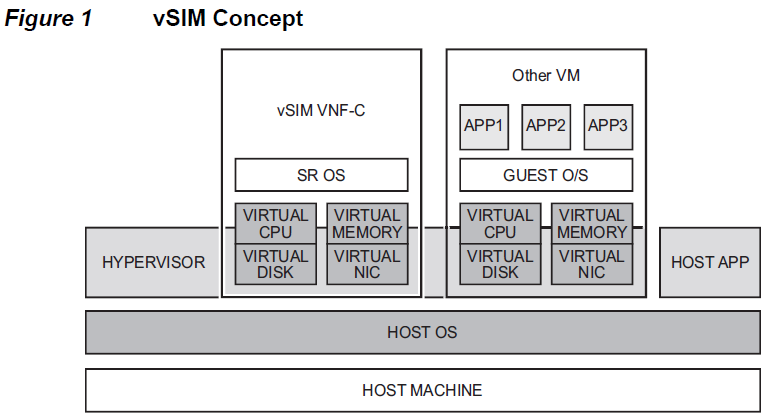
The diagram (taken from Nokia’s own guide) depicts the individual components involved in setting up vSIM. One thing that needs to be mentioned though is that a license is required for vSIM otherwise it won’t come up and it will reboot every hour.
Requirements
There’s a healthy list of requirements here:
- Host Machine: A server blade or a home PC – this guide is for blade implementations
- Hypervisor: Licensed VMware or QEMU-KVM – this guide will use KVM on VMware
- Host OS: VMware ESXi or Linux – the guide suggests certain distros, this implementation will be with Ubuntu
Integrated vs Distributed Model
One important consideration is to define if the devices needed in the lab are architecturally single CPM or not. If the lab requires devices like “SR-1”, “SR-1s”, or “IXR-R6” then there is no need for a nested KVM environment. These devices follow the Integrated model which uses a single VM to emulate the physical router. All functions and processing tasks of the emulated device (including Control, MGMT and Data planes) are performed by resources of the single VM.
Devices with single CPM do not need to go through all the jargon as they can natively be loaded on VSphere with a simple ova file, following the Integrated vSIM model.
The remaining arsenal of Nokia’s hardware is able to accommodate up to two CPMs and therefore requires two or more VNFCs (VMs) connected to a common internal network to emulate a single physical router (VNF). In this system, each VM is specialised, supporting either Control Plane processing (CPM) or Datapath functions (IOM).
In the distributed vSIM model there is support for one CPM or two hot-redundant CPMs in the same active-standby model as the emulated physical router.
The VMs of a Distributed system must be able to communicate privately over an internal network dedicated to the router being emulated, representing the Switch Fabric of a physical device.
Hardware Allocation Considerations
The Nokia guide covers this comprehensively but it is worth noting that in a realistic lab there should be a good mix of all the types of devices that exist in your network. There seem to be two general templates in hardware requirements:
High Spec Nodes: These require 8x vCPU,16GB RAM and 10G of storage
Lower Spec Nodes: These require 4x vCPU,16GB RAM and 10G of storage
CPU must be Intel (Sandy Bridge or later)
OS Considerations
Things in conglomerates don’t move fast, so the list is comprised of old distros of RHEL, CentOS and Ubuntu. This guide follows tha latest supported Ubuntu distro which is 16.04.7.
Storing the Guest OS ISO image
To upload the ISO image on the Datastore to be loaded when the VM spins up, go to the Datastore icon:

Choose then the desired datastore – if there’s multiple – then upload the image as seen fit. Remember this location as you’ll need to point the VSphere to that when creating the VM below!
Allocate Hardware on VSphere
The KVM environment will need to be built on VSphere first, allocating enough resource. Each lab is unique and therefore no suggestions will be made here – crunch your numbers and go for it, make sure Hot Plug is enabled to avoid unpleasant surprises later on!
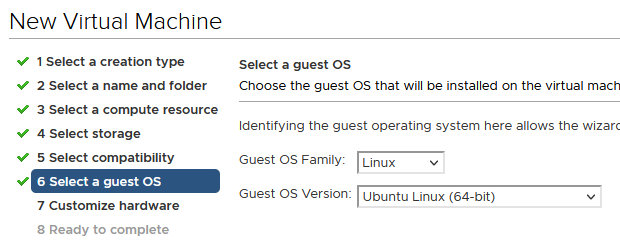
Start by building a new VM. Make sure the correct Guest OS family and version are chosen:
Then in Step 7, there’s a list of items needing attention:
Enable the ability to run assisted virtualisation on the Guest OS:

Choose the correct Network Adapter
Although the Nokia guide suggests that all types of network adapters are supported since their latest update only the E1000 seems to work as expected, so please ensure you choose E1000 and associate it with a VLAN that can break out to the internet in case you need extra packages for the Guest OS.
Point the VM to the correct ISO file:
Amend the CD Drive to “Datastore ISO File” and choose the location of the actual file to point to the OS image:

At this point the VM can be created and powered on.
OS Installation
Jump on console and follow the usual steps to set up the OS. Ensure an IP is given to the OS otherwise it won’t be able to fetch software required for packages and updates. Additionally, use the entire disk for one partition and setup LVM as it might be needed by libvirt.
When presented with options, make your life easier by ticking the installation of required packages that come with the image i.e. Virtual Machine host, OpenSSH Server etc
Configure KVM and libvirt
Download and install the following packages:
- sudo apt-get install libvirt-bin
- sudo apt-get install libvirt-doc
- sudo apt-get install qemu-kvm ubuntu-vm-builder
- sudo adduser `%Ubuntu_Username%` libvirtd
Once done, verify by issuing:
#virsh list –all (should not get any errors but an empty list of existing VMs)
For further information feel free to visit the official libvirt wiki.
Installing the QCOW2 image
The official guide suggests an image per card, but that is not required. Just download the .qcow2 image from Nokia’s OLCS once and re-use as needed.
Use your own choice of file transfer to get the image on the KVM box, here WinSCP was used to move the file to the user’s home directory, then moved to the required folder by issuing the below command from the directory:
#sudo -s mv cf3.qcow2 /var/lib/libvirt/images
Setup Bridge Interface
Download and install the bridge-utils package:
#sudo apt-get install bridge-utils
Check what interfaces already exist:
#ifconfig
Add an interface for every bridge required:
#sudo brctl addbr br0 and sudo brctl addbr br1
br0 is used for console access via the CPM’s management – there is no real need for this but feel free to set it up.
At this point, ensure the network interfaces file has the correct configuration:
#nano /etc/network/interfaces
Add the relevant as per below:
auto brx
iface brx inet dhcp
bridge_ports ensxx (for br0 to link to an interface only)
bridge_stp off
bridge_fd 0
bridge_maxwait 0
Restart the networking service for the changes to take effect:
#sudo /etc/init.d/networking restart
Important notes regarding bridges:
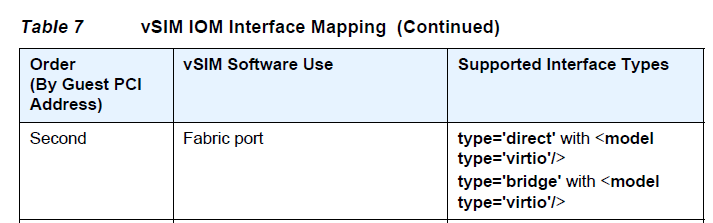
Once br1 is set, ensure it’s configured on all IOMs and CPMs on an individual VSIM, this is the Fabric port – without this port the cards cannot talk to each other:
Add a bridge interface per port expected to be physically up and having traffic over it i.e. for routing
Generate an XML file and run
Each user will need to come up with an XML file per VM according to the type of node they’re building so all I can offer here is some hints and tips:
virsh –connect qemu:///system create CPMA.xml
Run to initiate a VM for each card – in this case for CPM A
br0 = management, CPM-related only
br1 = fabric, must be existing in all XML files but as second bridge, the sequence does count!
br2 onwards will be physical ports on the IOM…
Bridge-related notes
sudo ip link add brx mtu 9000 type bridge
If it fails building the VM complaining about the bridge’s MTU. This could happen when not assigning a NIC, resulting in not having an MTU to inherit.
virsh list
virsh –connect qemu:///system dominfo CPMA
Verify the VM is up and running
Telnet 2500 on the host IP (2500 is an example, you set the port on the XML file)
Default CLI jump method. I prefer it as it’s default on the XML and console can be granted from VSphere anyway, resulting in br0 becoming obsolete
virsh destroy CPMA
Shut down the VM
Once done and happy with the result feel free to create a snapshot in case something goes terribly wrong!