
Two Microsoft products linked… what could possibly go wrong 🙂
The time has come – I need a central repository for my code so proper version control can be enforced.

Asking a colleague with experience in this field for a recommendation had me browsing Azure DevOps’s webpage as they provide 2GB of storage and 5 Basic users (collaborators). Sounds great for the few projects we’ll be building in the next couple of years!
Signing up to Azure DevOps
Surprisingly this actually needs to be added here because it took me some time to realise that the problem I had with signing up was plain old Browser incompatibility. Please ensure you do not use Firefox as it has an issue with CAPTCHA and keeps looping the signup screen no matter if you put the correct string or not.
Ensure the name given to your Organization is meaningful as it’ll be part of the link you’ll provide to the receiving parties. If you change your mind you can amend it later or even delete and create a new one, so it’s not the end of the world, although it will affect receiving parties if the link to the Repo changes at a later time.
Install GIT
GIT needs to be locally installed on your machine first from their official website. This is a very straightforward installation, just keep hitting next till you’re done (unless you know what you’re doing, then play around with the settings). I’d advise to run it with the default settings at first, especially to ensure the Branch naming remains “master” as that is the default on Azure DevOps too.
Configure GIT
Now that GIT is installed on the local machine, open Visual Studio Code to configure GIT from within VS Code. It can be done from GIT’s own command line interface but as we need VS Code anyway, we might as well do everything from within.
First we need to configure the GIT Credential Helper to securely store the GIT credentials used to communicate with Azure DevOps:
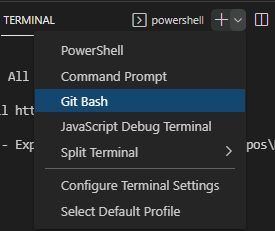
- From the main menu, select Terminal -> New Terminal this will open a new window.
- The default mode will probably be Powershell, open a new GIT Bash terminal as per below:
- Configure a credential helper by executing the command:
git config –global credential.helper wincred - Configure User Name for GIT commits:
git config –global user.name “[Name Surname]” - Configure email for GIT commits:
git config –global user.email [name.surname]@[domain].com
Further reading on this step: Git – First-Time Git Setup (git-scm.com)
Configure VS Code
Whilst in VS Code, press Ctrl+Shift+P and the Command Palette will appear in the centre top of the application. This is a useful tool access an array of tasks and extensions so make a note of this. From here we’ll initiate the Git clone process:
- In the Command Palette type the below and execute:
Git: Clone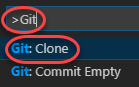
- This will trigger a request for the Repository URL. This can be found inside the specific Project that needs to be cloned. The link can be found under the Repos tab and there’s a choice of HTTPS or SSH. In this instance HTTPS is the preferable.
- Once inserted, a local file window will appear, choose the local folder that the Project’s Repo will be cloned to.
- At this point make sure both Azure DevOps and VS Code are logged in to the account relevant to this Git. The cloning will be carried out now. If not, click on the Clone in VS Code button on the Azure DevOps page within the Project/Repo page.
- Once cloning is complete, a little notification will appear at the bottom-right of the application, hit Open:

- If there’s any warnings when hitting Open above, feel free to ignore them as they are probably related to the fact that the solution is not in a buildable state as the Project has just begun.
Verifying Sync
To verify the sync works as expected, attempt a file sync. This starts usually from a user device as the first bit of code will be local with the aim of sharing via Git:
- Paste in the local folder created in Step 3 in the previous section the files that need to be synced – these should now appear in VS Code in the Explorer tab
- Go to Source Control and the files will be there in an uncommitted state under Changes. Click the Tick button to commit
- In case a response is requested type “commit”
- Another message might appear about staging changes, I’d advise to go for the “Always” option:
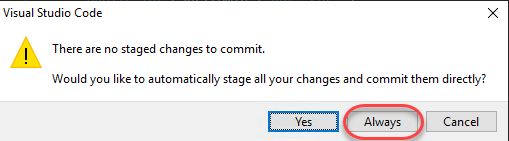
- Refresh page on Azure DevOps to verify the files are there
Troubleshooting
Things don’t always go smoothly, so here’s some tips from my own experiences:
- If it doesn’t automatically sync try and force it:

- If the error “Fatal: Couldn’t find remote ref master” then make sure the Branch is definitely named identically on both the Azure DevOps and the local VS Code instance. Additionally ensure VS Code is logged in to the account that has access to contribute to this Project
- Still getting “Fatal: Couldn’t find remote ref master” ? Try to force push of the files as per below:
